> For the complete documentation index, see [llms.txt](https://docs.voltera.io/docs/llms.txt). Markdown versions of documentation pages are available by appending `.md` to page URLs; this page is available as [Markdown](https://docs.voltera.io/docs/v-one/learn-v-one/v-one-projects/hello-world-project/3.-reflow-and-assembly.md).
# 3. Reflow and Assembly
*Before starting, ensure you have completed the* [*printing*](/docs/v-one/learn-v-one/v-one-projects/hello-world-project/1.-getting-started-with-your-first-print.md) *and* [*solder paste*](/docs/v-one/learn-v-one/v-one-projects/hello-world-project/2.-dispensing-solder-paste.md) *sections of this tutorial.*
## Assembly
Now that you have deposited solder paste on your circuit, all that is left to do is to place your components and reflow solder the board.
The Hello World circuit is a basic LED circuit. Holding a 9V battery to the + and - terminals on the circuit provides power, and a 555 timer IC chip sends the signal to flash the LEDs at a frequency determined by the resistor and capacitor values.
We have provided the board layout and schematic below. If you use EAGLE, you can also download the source files [here](https://github.com/VolteraInc/circuit-design-resources/raw/master/Voltera%20Project%20Gerbers/Hello%20World/Hello_World.zip).
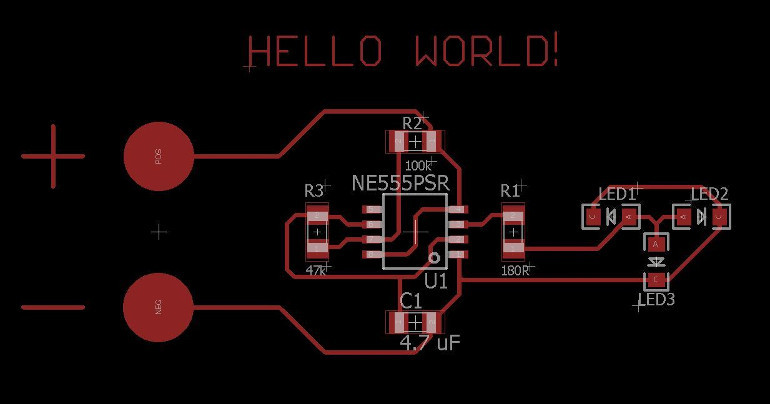
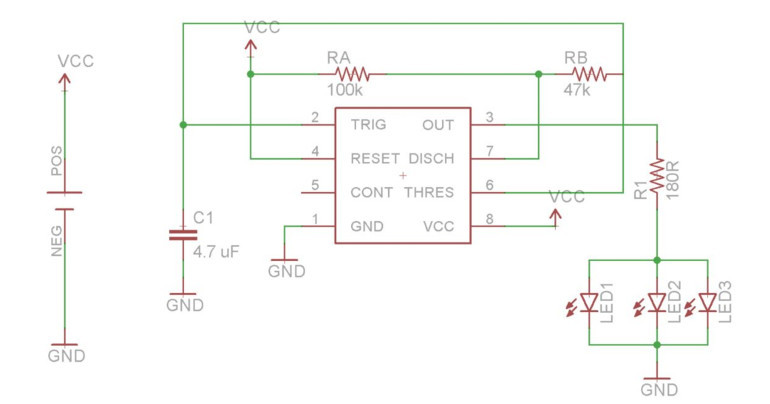
To assemble the circuit:
* Remove the components from the tape by peeling back the clear plastic.
* Carefully place your components onto the corresponding pads, as shown in the circuit layout.
{% hint style="success" %}
Use the tweezers included with the V-One to place components precisely.
{% endhint %}
Do not smear the solder paste when placing components. Once they are placed, press down gently so the components rest evenly on the pads.
The components included in the Hello World Circuit Kit are Surface Mount Devices (SMD). Just like through-hole components, there are conventions for reading the values and orientations of SMD components.
#### Resistors
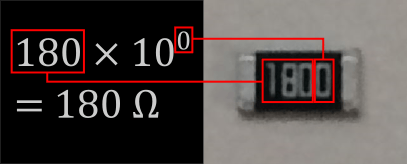
The value of an SMD resistor is written directly on the package. The last digit is the multiplier, while the digits in front of it give the value:
#### LEDs
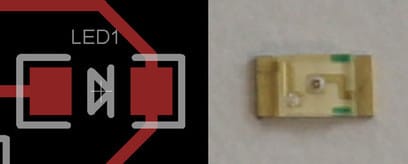
Unlike resistors, LEDs have a polarity! One side of the LEDs will be marked green, indicating the negative terminal. The image below shows how the LEDs should be arranged, according to the circuit layout:
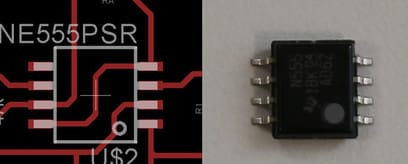
#### ICs (integrated circuits)
These packages must be placed in the correct orientation so that the pins line up with the right pads. There is a dot on the package (and in the layout) that indicates PIN #1, as shown below:
## Reflow
Now that everything is set up, the circuit is ready to be reflow soldered.
1. From the start menu, select the **HEAT** option.
2. Click the **REFLOW** tile.
3. Select the solder paste you're using, based on the Lot name on the cartridge label.
4. Click **REFLOW** to start the process.
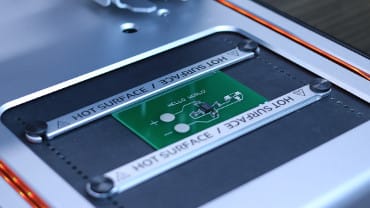
{% hint style="danger" %}
The V-One gets hot while reflowing. Do not touch! Do not leave unattended while heating!
{% endhint %}
When the heating cycle finishes, the V-One will start **glowing blue**. This means the soldered PCB is safe to remove.
## Congratulations!
Your very first V-One printed and reflowed PCB is done! Unpack the 9V battery, and press the battery leads to the labelled pads to see your circuit say hello!
This concludes the Hello World tutorial. We suggest you visit our maintenance article to learn how to keep the V-One in tip top condition.
---
# Agent Instructions
This documentation is published with GitBook. GitBook is the documentation platform designed so that both humans and AI agents can read, navigate, and reason over technical content effectively. Learn more at gitbook.com.
## Querying This Documentation
If you need additional information that is not directly available in this page, you can query the documentation dynamically by asking a question.
Perform an HTTP GET request on the current page URL with the `ask` query parameter, and the optional `goal` query parameter:
```
GET https://docs.voltera.io/docs/v-one/learn-v-one/v-one-projects/hello-world-project/3.-reflow-and-assembly.md?ask=&goal=
```
`ask` is the immediate question: it should be specific, self-contained, and written in natural language.
`goal` is optional and describes the broader end goal you are ultimately trying to accomplish on behalf of the user. GitBook uses it to tailor the answer towards what is most useful for that goal.
The response will contain a direct answer to the question and relevant excerpts and sources from the documentation.
Use this mechanism when the answer is not explicitly present in the current page, you need clarification or additional context, or you want to retrieve related documentation sections.
