> For the complete documentation index, see [llms.txt](https://docs.voltera.io/docs/llms.txt). Markdown versions of documentation pages are available by appending `.md` to page URLs; this page is available as [Markdown](https://docs.voltera.io/docs/v-one/learn-v-one/v-one-projects/hello-world-project/2.-dispensing-solder-paste.md).
# 2. Dispensing Solder Paste
{% hint style="warning" %}
*Before starting, ensure you have completed the previous section* [1. Getting Started with your First Print](/docs/v-one/learn-v-one/v-one-projects/hello-world-project/1.-getting-started-with-your-first-print.md)
{% endhint %}
{% stepper %}
{% step %}
### Select the workflow
To begin dispensing solder paste, select **SOLDER**.
{% endstep %}
{% step %}
### Choose a solder paste
The software will ask you to select which solder paste you are using. Have a look at your solder paste cartridge, and select the matching name on the screen. This will ensure your software is using the right print settings!
{% hint style="info" %}
If you don't see the name of your solder paste in the list, click the "**Add Pastes**" button to add it!
{% endhint %}
{% endstep %}
{% step %}
### Load the circuit
Click the **Hello World** hyperlink in the instruction panel to load in the circuit design.
{% hint style="success" %}
Notice that this time, our design includes only the contact pads of the circuit. That’s because solder paste will only be dispensed where the components will be placed!
{% endhint %}
{% endstep %}
{% step %}
### Clamp the board
Your board should already be clamped down from the previous printing step. If it's not, clamp your board down using the clamps and thumb screws. Remember to use the clamping ledge (side with notches) to secure your printed board down.
{% endstep %}
{% step %}
### Mount the probe
Mount the probe. Remember, we want to place the lower magnets on first, and then allow the top magnets to connect to the rails.
{% endstep %}
{% step %}
### Align the circuit
To dispense solder paste over top of our printed pads the V-One needs to know the orientation of the board. To do this, we need to help the V-One locate the designated pads:
1. Click the **MOVE TO FEATURE** button to start the pad location process.
2. Use the **arrow keys** to move the printer to the *approximate* location of the pad that is highlighted in the print preview. You do not need to align it perfectly just yet.
3. Click **LOWER** to drop the probe to the surface of the board.
4. Use the **arrow keys** to once again adjust the position of the probe. This time, position the probe in the **center** of the highlighted pad.
5. Click **MEASURE** to confirm the pad location.
6. Repeat steps 1-5 for the second highlighted pad.
{% hint style="success" %}
Take your time! If the alignment is off, the solder paste will not print in the right spot.
{% endhint %}
After locating the pads, the V-One now knows where the board is located.
{% endstep %}
{% step %}
### Validate the pad positions
Before we get to printing the solder paste, use this step to make sure that the pad alignment is accurate.
Click on any pads in the print preview, and the printer will go to the center of the pad. If you notice that the position is off, press the **BACK** button and repeat the Locate Pad steps.
{% endstep %}
{% endstepper %}
## Print
{% stepper %}
{% step %}
### Load and prime the dispenser
Now we need to load our solder paste into the dispenser and prime it.
1. Load the solder paste cartridge and assemble the dispenser.
2. Slowly turn the gear **counter-clockwise** until you feel resistance (this is the dispensing plunger hitting the ink). Keep turning until you push a tiny amount of ink out of the nozzle.
3. **Rotate the gear ¼ turn clockwise to stop the flow of ink.**
4. Wait until the ink stops leaking from the nozzle and gently wipe the nozzle clean.
5. Mount the dispenser on the carriage.
{% endstep %}
{% step %}
### Calibrate first
Unlike when we printed our Hello World circuit with conductive ink we do not have a built in calibration step for solder paste. To calibrate the solder paste we will selectively print on two of our pads until we are happy with the results.
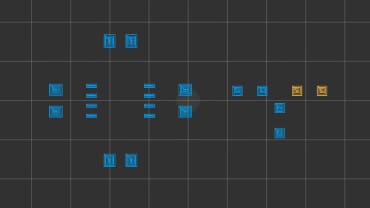
1. Select two of the pads to print solder paste on - we recommend using the orange pads selected above.
2. Click **START** to begin printing. Adjust the solder paste flow using **+** and **-** until the pads are completely covered, but not overflowing.
3. If there is too much paste, wipe the solder off of the selected pads and decrease the flow.
{% hint style="success" %}
**Hint:** Keep repeating these steps until you are happy with the amount of solder paste being deposited.
{% endhint %}
{% endstep %}
{% step %}
### Print solder paste
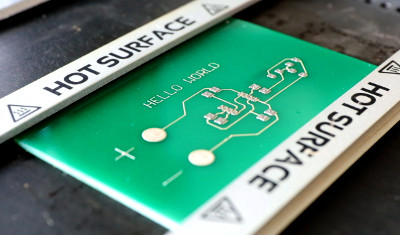
When you are happy with the amount of solder paste dispensed during calibration, select the remaining pads and press print!
{% endstep %}
{% endstepper %}
This completes the solder paste dispensing feature. Let’s move along to the next article and discover the V-One’s reflow capabilities!
{% hint style="info" %}
Solder paste can be good for up to 8 hours, but the best practice is to reflow as soon as possible after dispensing.
{% endhint %}
---
# Agent Instructions
This documentation is published with GitBook. GitBook is the documentation platform designed so that both humans and AI agents can read, navigate, and reason over technical content effectively. Learn more at gitbook.com.
## Querying This Documentation
If you need additional information that is not directly available in this page, you can query the documentation dynamically by asking a question.
Perform an HTTP GET request on the current page URL with the `ask` query parameter, and the optional `goal` query parameter:
```
GET https://docs.voltera.io/docs/v-one/learn-v-one/v-one-projects/hello-world-project/2.-dispensing-solder-paste.md?ask=&goal=
```
`ask` is the immediate question: it should be specific, self-contained, and written in natural language.
`goal` is optional and describes the broader end goal you are ultimately trying to accomplish on behalf of the user. GitBook uses it to tailor the answer towards what is most useful for that goal.
The response will contain a direct answer to the question and relevant excerpts and sources from the documentation.
Use this mechanism when the answer is not explicitly present in the current page, you need clarification or additional context, or you want to retrieve related documentation sections.


