> For the complete documentation index, see [llms.txt](https://docs.voltera.io/docs/llms.txt). Markdown versions of documentation pages are available by appending `.md` to page URLs; this page is available as [Markdown](https://docs.voltera.io/docs/v-one/learn-v-one/v-one-projects/hello-world-project/1.-getting-started-with-your-first-print.md).
# 1. Getting Started with your First Print
## Software
{% stepper %}
{% step %}
### Open the software
When you open the Voltera V-One software you will be welcomed by the start screen and it will automatically connect to the printer if it is plugged in.
Our software will guide you through the steps of each feature as you go. Let’s review them quickly:
* **PRINT**: Print your designed circuit pattern onto a blank FR1 board.
* **SOLDER**: Dispense solder paste onto fabricated or V-One printed boards.
* **HEAT**: Bake wet ink, and reflow components onto fabricated or V-One printed boards.
* **DRILL**: Drill holes of various sizes onto your blank FR1 board with the V-One Drill.
{% endstep %}
{% step %}
### Sidebar - Tour of the UI!
Before we move further, let's look at some useful elements in the user interface. In the top right corner of the app, you have the following:
1. **Status Info**: Connection status, temperature, and position of the print head.
2. **E-Stop**: Immediately stops the V-One. Alternatively, you can press the Esc key 2 times.
3. **Home**: Moves the printer to the home position.
4. **Settings**: Adjust your print settings if required.
5. **Support**: Have a problem? Let us know. For tech support, please include your Gerber files!
6. **Language**: Select your prefered language
{% endstep %}
{% step %}
### Selecting the workflow
To begin printing your first circuit, select **PRINT**.
The software will then prompt you to choose whether you are doing a **SIMPLE** or **ALIGNED** print. Since we're starting with a bare board, select **SIMPLE**.
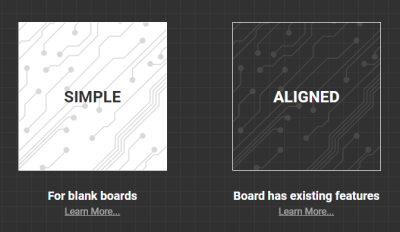
Finally, the software will ask you to select which ink you are using. Have a look at your ink cartridge, and select the matching ink name on the screen. This will ensure your software is using the right print settings!
{% hint style="info" %}
If you don't see the name of your ink in the list, click the "**Add Inks**" button to add it!
{% endhint %}
{% endstep %}
{% step %}
### Loading a circuit
Take a moment to familiarize yourself with the software interface. Instructions will be presented on the left, and videos are displayed on the right.
1. Click the **Hello World** hyperlink in the instruction panel.
2. Wait for circuit to load.
3. Click **Next**.
{% endstep %}
{% endstepper %}
## Positioning the circuit
{% stepper %}
{% step %}
### Clamp the board
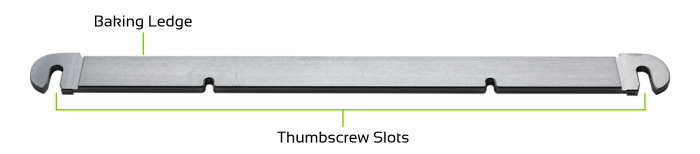
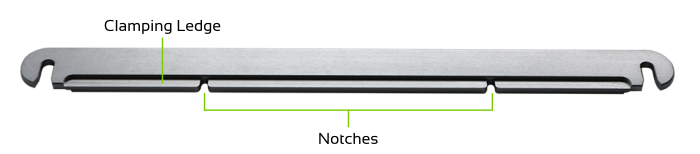
The clamps have 2 ledges, a **Clamp** ledge and a **Bake** ledge. Take a moment now to get familiar with the clamps.
**Clamps - top side**
**Clamps - bottom side**
{% hint style="warning" %}
The Baking Ledge is no longer needed for Conductor 3 as your board doesn't need to be flipped for baking. It is only required for Conductor 2 or our Flex 2 Ink where flipping is still required.
{% endhint %}
The **Clamp** ledge is what you will use now to secure the board during printing and later during solder paste dispensing.
1. Secure the board underneath the **Clamp** ledges, and push the clamps inward against the board. The notches should be facing the board!
2. Screw down the clamps so that the provided thumb screws are finger-tight.
3. Make sure the board is fully secured.
{% endstep %}
{% step %}
### Mount the probe
Mount the probe by placing the lower magnets first, and then allowing the top magnets to connect to the rails.
The contact pads at the back of the probe should be aligned with the probe contact pins on the carriage.
{% hint style="warning" %}
Don't remove the Probe or Dispensers unless prompted by the Software! If you need to do so for any reason, click the HOME button to re-calibrate before proceeding.
{% endhint %}
{% endstep %}
{% step %}
### Position the circuit
In this step the V-One will ensure that there is a clear print path on the clamped board. The probe tip will outline the boundary of the area to be printed. If the probe outline doesn't fall within the board boundaries, click and drag the circuit to adjust the position and outline again.
{% endstep %}
{% step %}
### Probe the board
Outline look good? Go to the next step and click **PROBE**. The V-One will now automatically generate a height map of the board’s surface. This height map is critical for good quality printing.
{% hint style="warning" %}
If you need to move the board for any reason after this step, you must return and RE-PROBE.
{% endhint %}
{% endstep %}
{% endstepper %}
## Assemble and Prime the Dispenser
{% stepper %}
{% step %}
### Assemble the dispenser
{% hint style="info" %}
Be sure the dispenser’s plunger is fully retracted before assembling. If the plunger is too far out it can push ink out during assembly.
{% endhint %}
1. Remove the coloured cap and lid from the ink cartridge.
2. Insert the conductive ink cartridge into the sheath with the ink level visible through the viewing window.
3. Reinsert the dispensing unit back into the cartridge sheath twisting 90° to lock it in place.
4. Carefully twist the nozzle onto the end of the cartridge.
{% endstep %}
{% step %}
### Prime the conductor
Priming the conductor is important to confirm good ink flow before dispensing.
1. Slowly turn the gear **counter-clockwise** until you feel resistance (this is the dispensing plunger hitting the ink).
2. Keep turning until you push a tiny amount of ink out of the nozzle.
3. **Rotate the gear ¼ turn clockwise to stop the flow of ink.**
4. Wait until the ink stops leaking from the nozzle and gently wipe the nozzle clean.
5. Mount the dispenser on the carriage.
{% endstep %}
{% endstepper %}
## Material Calibration
Calibrating the conductor will determine the resolution of your print, so pay close attention to this step and take your time! Clicking **CALIBRATE** will print the calibration pattern.
Use the curved lines to make sure enough ink is coming out. Then, adjust the horizontal lines so they are not touching – **even a small gap is enough!**
You can adjust the width of the printed lines while printing by controlling the amount of ink dispensed with the **+** and **-** buttons:
* The **+** button dispenses more ink by a tiny amount. It will make the lines thicker.
* The **-** button dispenses less ink by a tiny amount. It will make the lines thinner.
{% hint style="info" %}
[Here's a thorough overview of the 'E'- Value next to the + and - buttons.](https://docs.voltera.io/v-one/getting-started/quickstart-videos#e-value-guide-1-16-min)
{% endhint %}
After the calibration pattern has printed, take a moment to inspect the quality. Compare it to the ✅ good example shown above.
* If it doesn’t look quite right, don’t worry! Just use a lint-free wipe and isopropyl alcohol to gently clean off the ink, then press **CALIBRATE** again to reprint the pattern.
* If it looks good, clean off the calibration pattern and move on to the next step.
## Printing
You are now ready to print your first circuit! So go for it, press **START**!
{% hint style="info" %}
If you need to adjust the amount of ink being dispensed mid print use the **-** or **+** buttons.
{% endhint %}
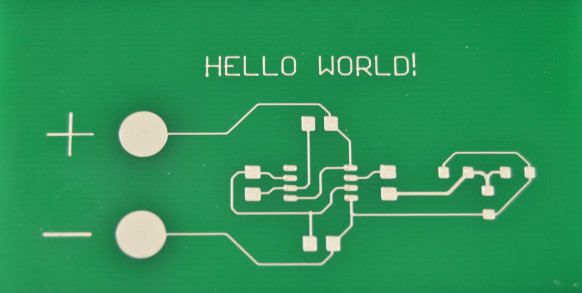
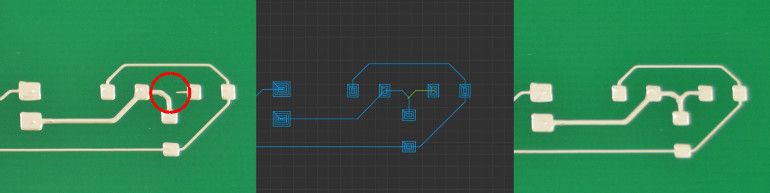
Once the print is complete your circuit should look something like the image below:
#### **Does your circuit look different?**
If the pads are **touching each other** (shorted) that means there is too much ink. Wipe the ink off and repeat the calibration step.
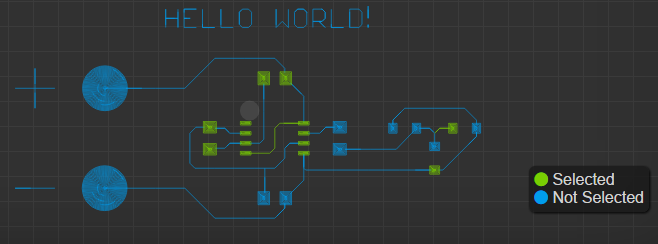
If there are **gaps** in the circuit, try our selective printing feature! Select the broken area in the print preview, and click **START**.
#### **Want more control?**
* Click and drag to select multiple features at once.
* Holding the **Shift** key while selecting features will add them to the current selection.
* Holding the **Ctrl** key when selecting features will remove them from the current selection.
The **Legend** can be found in the bottom-right corner. This tells you how to interpret the Print Preview. You'll see later how this is helpful, when using the Selective Print feature.
## Baking
{% hint style="danger" %}
The V-One gets hot! Do not touch the printer while it's glowing red.
{% endhint %}
Your circuit is printed, but we can’t do much with wet ink… that’s what baking is for! We are about to dry the conductive ink. Remove the conductive ink dispenser from the carriage. Cap the dispenser, and **store it in the refrigerator**.
Now when you are ready press the **START** button to begin baking.
## Congratulations!
You have printed your first V-One PCB! This completes the first print guide.
When you are ready to assemble your circuit, continue to the next articles where we lead you through the V-One solder paste and reflow features.
---
# Agent Instructions
This documentation is published with GitBook. GitBook is the documentation platform designed so that both humans and AI agents can read, navigate, and reason over technical content effectively. Learn more at gitbook.com.
## Querying This Documentation
If you need additional information that is not directly available in this page, you can query the documentation by asking a question.
Perform an HTTP GET request on the following URL with the `ask` and `goal` query parameters:
```
GET https://docs.voltera.io/docs/v-one/learn-v-one/v-one-projects/hello-world-project/1.-getting-started-with-your-first-print.md?ask=&goal=
```
`ask` is the immediate question: it should be specific, self-contained, and written in natural language.
`goal` is what the user is ultimately trying to achieve, the reason they need the answer. Sharing it helps GitBook give you a better, more relevant answer. A goal is most helpful when it describes the outcome the user wants rather than restating the question. For example, with `ask=how do I create an API token`, a goal like `automate deployments from our CI pipeline` lets GitBook tailor the answer to that use case.
The response will contain a direct answer to the question and relevant excerpts and sources from the documentation.
Use this mechanism when the answer is not explicitly present in the current page, you need clarification or additional context, or you want to retrieve related documentation sections.


